Star Power
Demystify the HTTP Connector in Power Automate with a Daily Horoscope API
Overview
Some swear that the stars are behind everything. Celestial bodies – their positions, their movements – drive our lives, and the practice of astrology reveals insight into life events and relationships.
To others, this is pseudoscience. Empirical evidence is lacking, therefore argument invalid. Hogwash.
Yet it would be hard to argue against astrology’s long-standing and worldwide influence. Johannes Kepler, the German math whiz behind the laws of planetary motion, had a side gig casting horoscopes for Rudolf II the Holy Roman Emperor. Rudolf didn’t get the chance to ask for a refund and as of April 2022, nearly 30% of Americans still believe stars and planets have an influence on earthly outcomes.
Despite humankind’s technological advancements, people still want that crystal ball. All they got was a thing called “the cloud.”
Not quite a soothsayer, Power Platform allows us to connect to APIs to automate data retrieval and delivery tasks. Power Automate easily integrates this star-crossed information into our tech-driven lives via more modern means with the HTTP connector. Horoscope readings can be extracted from an API, the data is parsed, then consumed and used later on by another process.
To some, we are simply dealing with powerful automation orchestrators. To others, we are revealing the secrets in the stars guiding our lives.
All of it just got faster.
/**/
This article will demonstrate how to connect to a JSON feed in Power Automate using the HTTP connector and create formatted results with the output.
Caveats
A few things to know before you go.
Focus on Western astrology. Although this article maintains a technical focus, it’s worth noting that astrology is not a Western phenomenon. Eastern and Vedic astrology, for example, share some similarities, with each having their distinct approaches and cultural influences.
Educational purposes. Astrology is not considered an actual science. This guide is intended to teach a concept by making it relatable, accessible, and yes, a little bit out there ^_^
Unofficial. APIs for this sort of thing can be astronomically (ha?) expensive. This particular API draws from a free resource, but it shall be considered unofficial. No vested interest on my end.
No authentication. A username, password or API key is not required. The details of the HTTP connector will be covered later.
Premium connector. The HTTP connector is required. It is a premium connector.
Not so bad.
Prerequisites
Basic “system requirements:”
Foundational knowledge. It helps to know just a little about how APIs work, in particular REST APIs. This type of API uses HTTP protocols to execute commands against a resource using methods: GET (read), POST (write), PUT (update) and DELETE (delete) data. XML is one possible format but data is more likely to be represented in JSON. Power Automates' HTTP connector allows you to send these requests to a REST API, which is the focus of this guide.
Power Automate subscription. I use a Developer plan. Not meant for production but for personal use and exploration, as this plan affords all services and connectors for free for learning, with conditions, of course.
Required connectors. The Outlook connector is the only app-specific connector used but not required. The HTTP connector is a premium connector.
Horoscope API. This guide will feature an API based on the free daily readings available from Astrology.com via the work of Amanda Y Huang. We are connecting to this data source, but credit goes to them.
Not too bad.
Steps to “Get Your Free Reading” via Power Automate
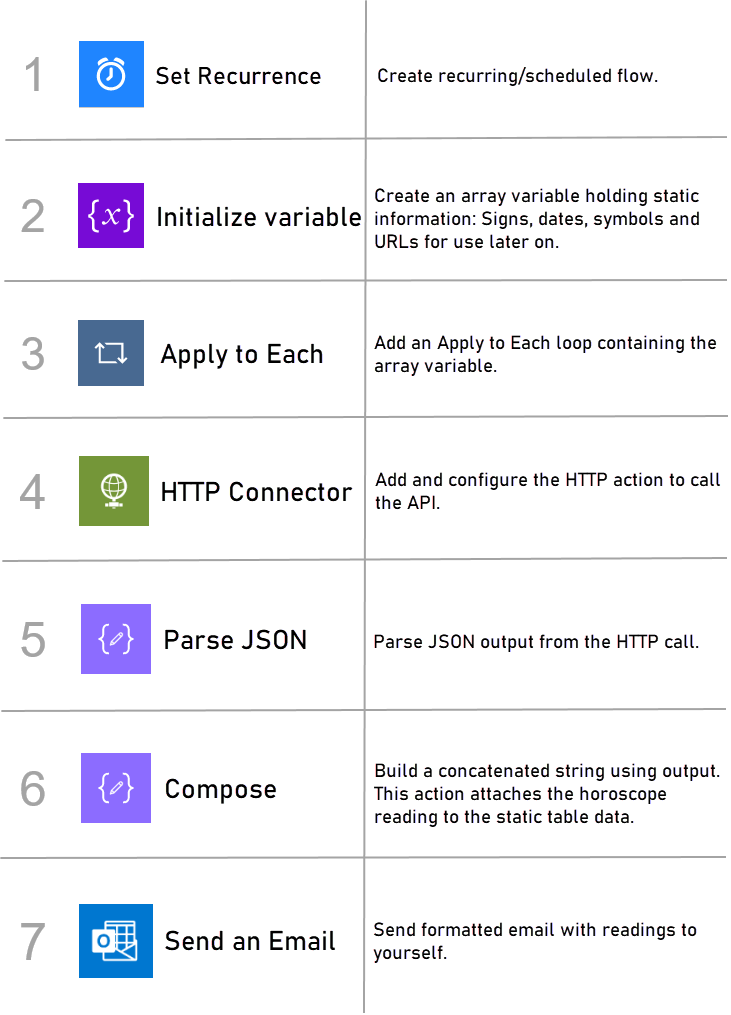
Retrieving horoscope data from the API follows a general process.
A few steps but the process remains light.
Configure Flow in Power Automate
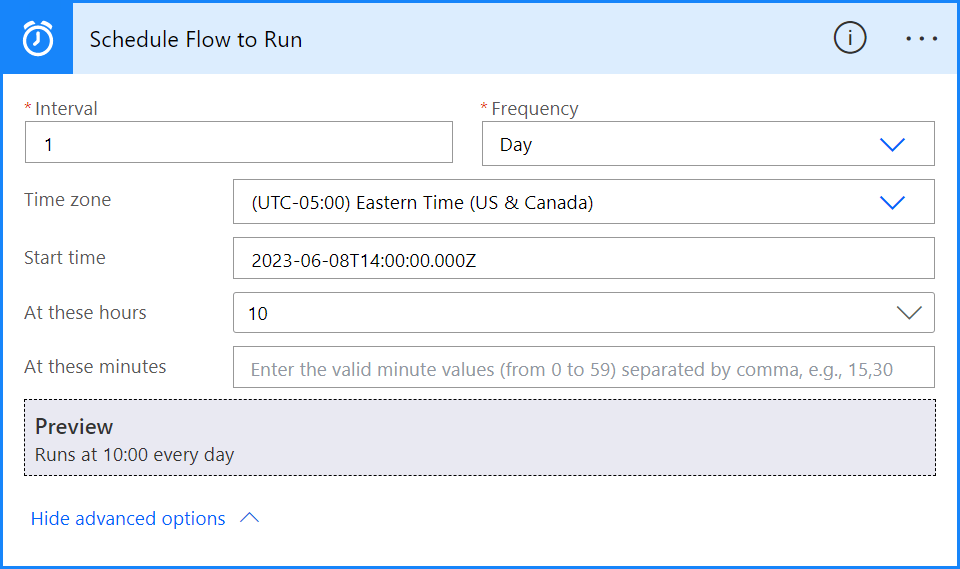
Recurrence
Create a scheduled flow in Power Automate.
Set the extract schedule to Day. The readings only apply to the day that they are sent.
Initialize Variable
Add an Initialize Variable action.
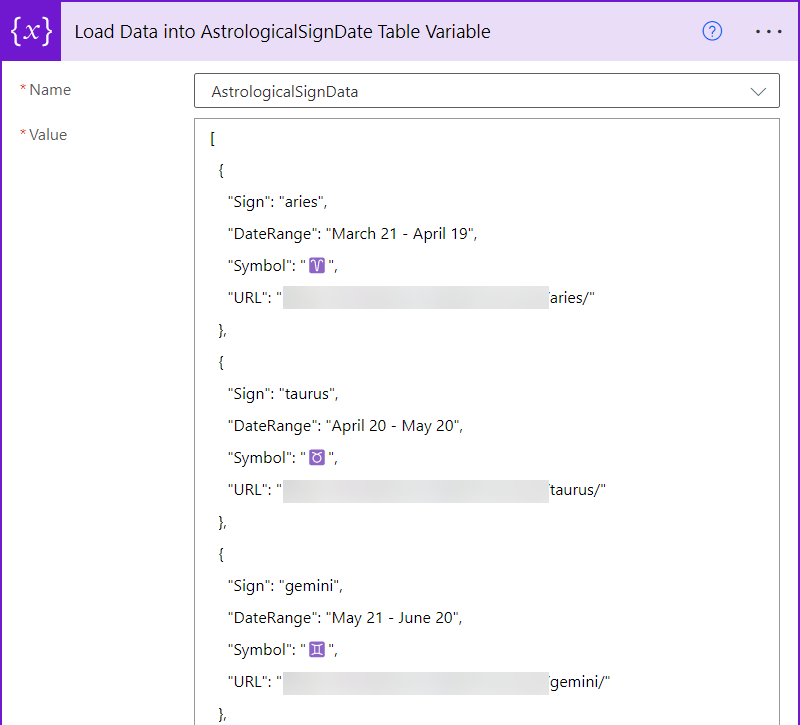
This action creates a table then loads static data for each astrological sign: Zodiac sign, date range, symbol and URL to the horoscope.
Give the variable a name, AstrologicalSignData. Feel free to initialize the variable and set the value in the same step or break the actions into two separate steps.
Add the code snippet below to the Value field.
[
{
   "Sign": "aries",
   "Symbol": "♈",
   "DateRange": "March 21 – April 19",
   "URL": "..."
 },
 {
   "Sign": "taurus",
   "Symbol": "♉",
   "DateRange": "April 20 – May 20",
   "URL": "..."
 },
 {
   "Sign": "gemini",
   "Symbol": "♊",
   "DateRange": "May 21 – June 20",
   "URL": "..."
 },
 {
   "Sign": "cancer",
   "Symbol": "♋",
   "DateRange": "June 21 – July 22",
   "URL": "..."
 },
 {
   "Sign": "leo",
   "Symbol": "♌",
   "DateRange": "July 23 – August 22",
   "URL": "..."
 },
 {
   "Sign": "virgo",
   "Symbol": "♍",
   "DateRange": "August 23 – September 22",
   "URL": "..."
 },
 {
   "Sign": "libra",
   "Symbol": "♎",
   "DateRange": "September 23 – October 22",
   "URL": "..."
 },
 {
   "Sign": "scorpio",
   "Symbol": "♏",
   "DateRange": "October 23 – November 21",
   "URL": "..."
 },
 {
   "Sign": "sagittarius",
   "Symbol": "♐",
   "DateRange": "November 22 – December 21",
   "URL": "..."
 },
 {
   "Sign": "capricorn",
   "Symbol": "♑",
   "DateRange": "December 22 – January 19",
   "URL": "..."
 },
 {
   "Sign": "aquarius",
   "Symbol": "♒",
   "DateRange": "January 20 – February 18",
   "URL": "..."
 },
 {
   "Sign": "pisces",
   "Symbol": "♓",
   "DateRange": "February 19 – March 20",
   "URL": "..."
 }
]
If you are wondering about the Symbol field, I was surprised to find that each astrological signs of the zodiac have their own symbols in text and emoji format. It goes deep, folks, so I added the Symbol and range of dates for each sign.
The finished control:
Apply to Each
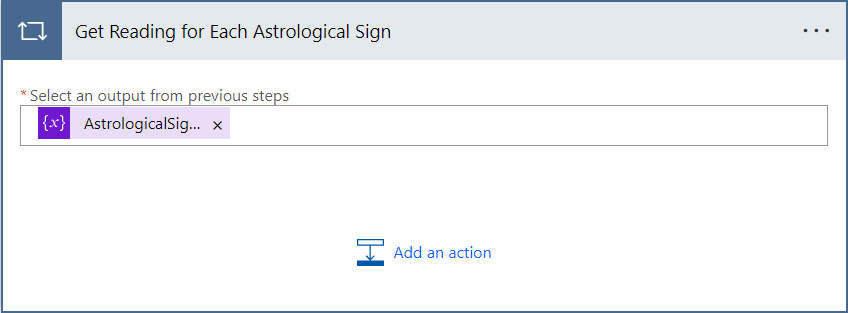
Add an Apply to Each action.
This action will loop through the table, grab the web address for each sign by using the URL field and send a request for each sign that will bring back all horoscopes.
Place the AstrologicalSignData output in the Select an output… area.
Add an HTTP Connector within the Apply to Each action.
Add the URL value to the URI field via the Dynamic Content window.
A few notes on the properties of the HTTP connector.
Endpoint. An endpoint is where the resource or service is stored, and an API communicates with the endpoint using URLs to send requests and get responses. Bit of a fancy name but it is simple as that.
Method. Use GET, as we are fetching information from an endpoint.The method is the type of action for the request. The options are GET, POST, PUT, DELETE, etc. GET “gets” data, POST sends data to the server, PUT and PATCH update existing data, and DELETE deletes data. Use GET, as we are fetching information from an endpoint.
URI. The Uniform Resource Identifier is the URL where the resource or service is located. It is a typical website URL and may contain a path after the domain name (www.your site name.com/api, etc.). Add the URL field from the previous step via the Dynamic Content window.
Headers. Headers are information that are sent along with the request to use the service. They are optional but sometimes they are required depending on the API, especially if an authentication token is required. This helps the server handle the request. Without them, they may fail, but today we do not need to use any. Leave these fields empty.
Body. The request body contains the data you want to send to the server. It is used in POST, PUT, and PATCH requests to send data in JSON or XML format. The body carries the actual content of the request, such as form data, file attachments, or structured data. Leave this field blank, as we are using the GET method.
Queries. These are additional parameters that are sent along with the URI, not the headers. Think of this in terms of “query criteria.”
Queries can include one or many criteria:
https://api.swolcat.com/endpoint?name=Rudolf&city=ViennaFurther, the query itself can also be constructed on the fly, so allows us to build a dynamic request that uses, for example, user input, output from the previous step or a variable.
An expression in a control would look similar to this:
concat('https://api.swolcat.com/endpoint?', 'name=', encodeURIComponent(variables('name')), '&city=', encodeURIComponent(variables('city')))Authentication. The Advanced Options in the connector can be expanded to show the authentication options, depending on what the API requires. None requires no credentials. Basic requires a username and password. Active Directory OAuth authenticates against your Azure tenant. Certificate utilizes a certificate. API tokens can be used in the Headers section as well, with the Authentication option set to None. The token passed in the Headers handle getting past the door.
Response. Although not a part of the request or the connector, but rather an answer or reply after the request is sent to the server. The data returned in the response can be used in the subsequent steps of the flow, which is exactly what we will do in the next step.
Parse JSON
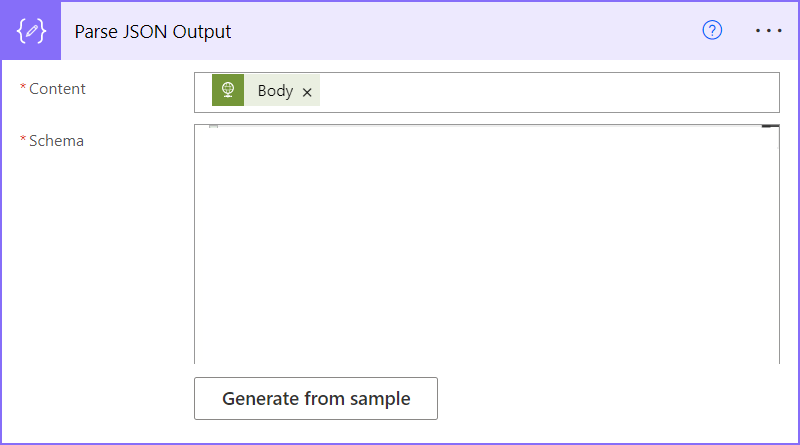
Add a Parse JSON action.
This action will take the JSON response from the server and transforms the data into a structured format. By providing the schema representing the data structure, the action validates the incoming data against that schema.
Add Body to the Content field via the Dynamic Content window.
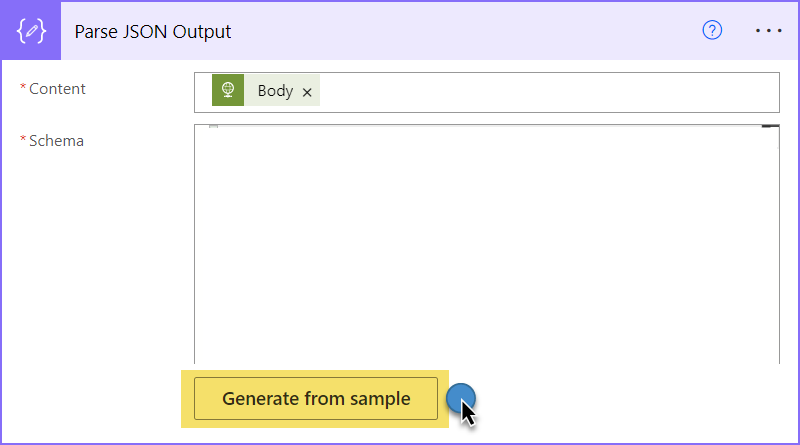
Next, click the Generate from sample button, beneath the Schema area.
Add the following schema to the Insert a sample JSON payload window and click Done.
{
    "type": "object",
    "properties": {
        "sign": {
            "type": "string"
        },
        "date": {
            "type": "string"
        },
        "horoscope": {
            "type": "string"
        },
        "Symbol": {
            "type": "string"
        },
        "DateRange": {
            "type": "string"
        }
    }
}
The control should appear so:
Compose
Add a Compose action.
After we have selected the fields from the array, the Compose action uses the concat() function to “string together” the array elements into a big block of text.
Add this expression to the Inputs field:
concat(toUpper(body('Parse_JSON_Output')?['sign']), ' | ', items('Get_Reading_for_Each_Astrological_Sign')?['Symbol'], ' | ', items('Get_Reading_for_Each_Astrological_Sign')?['DateRange'], '<br/><br/>', body('Parse_JSON_Output')?['horoscope'], '<br/><br/>')Bear in mind that the indexes are zero-based. The first field index is 0, the second field is 1, and so on.
The control should appear so:
Using item()?['sign'] also works.
Let's get this into an email that you can wake up to every day, or...something like that.
Send an Email
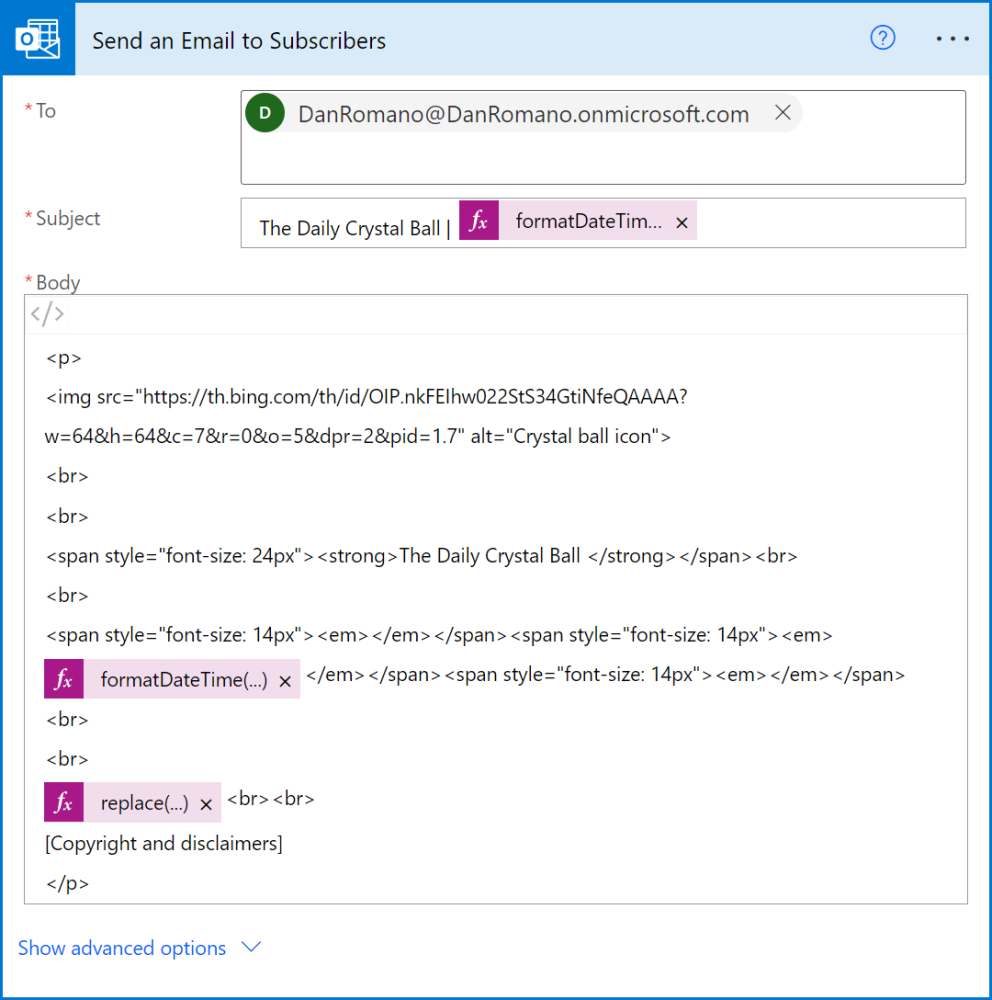
Add an Outlook Send an Email action.
Add the final expression to the body of the email to send to yourself. Include any styling of your own.
replace(replace(replace(replace(string(outputs('Compose_Concatendated_String_with_Array_Elements')), '[', ''),']',''),'"',''),',','')*It is important to note that there are many ways to replace characters from the output. Some are far more involved than others, but the replace() function is just fine for now.
The action is HTML-friendly, so we can send a formatted email with markup language and even include CSS (not shown below).
Expression for formatting date and time:
formatDateTime(body('Parse_JSON_Output')?[1]?['date'], 'MMMM d, yyyy')We are in business. Done.
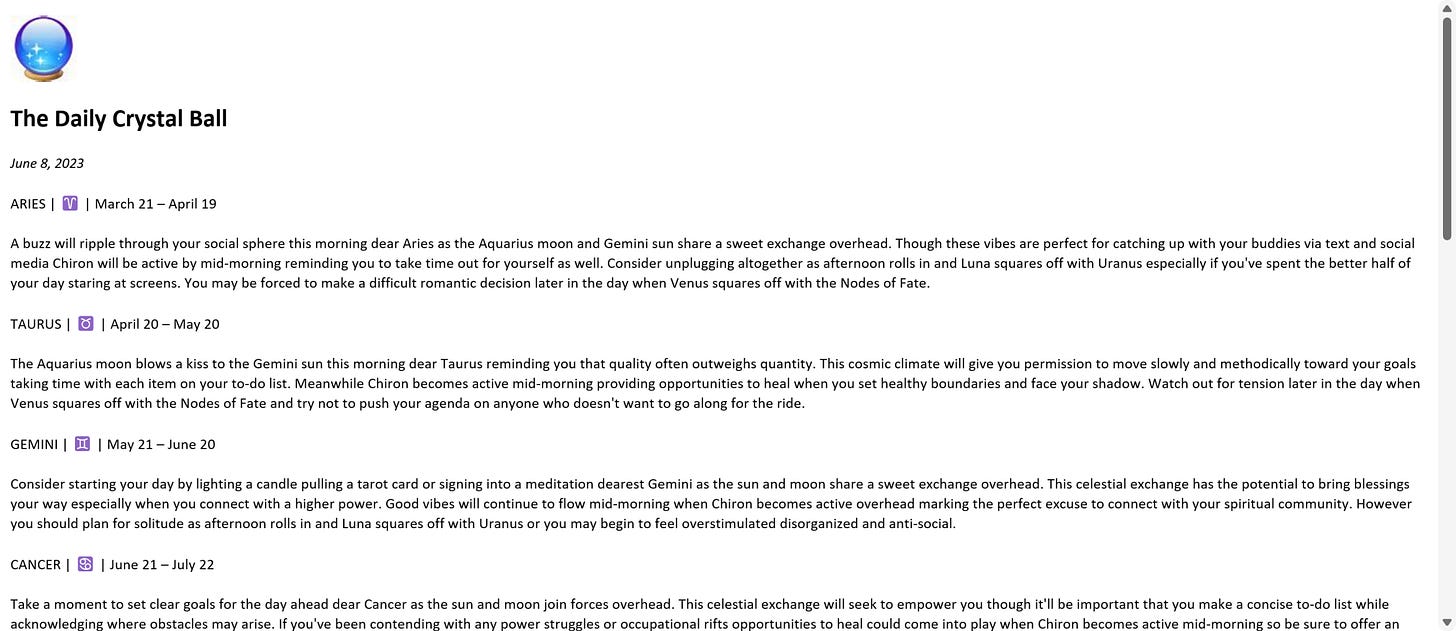
Test in Outlook
The moment of truth. Run the flow and check your email.
Done, star child!
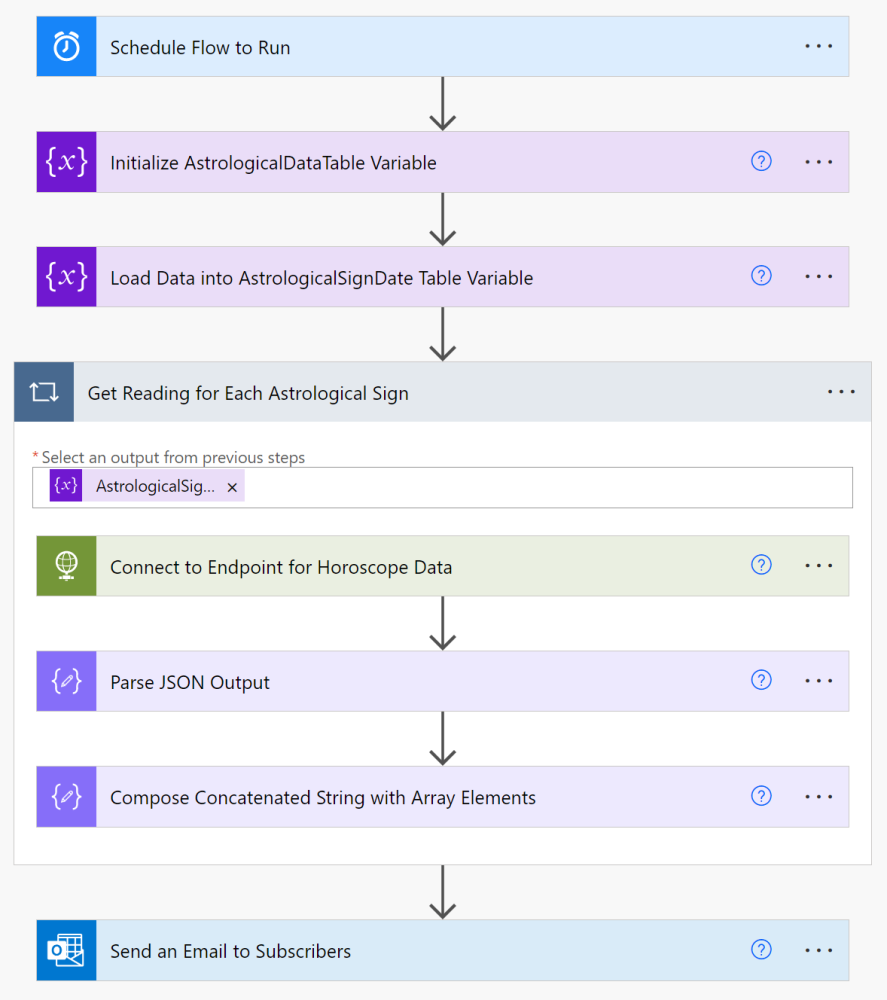
The final flow:
And that's it.
Next Steps
A few suggestions for where to go next with this.
Challenge yourself. Now that we have covered how to connect to a custom API that is simple (one request, no authentication), you can now expand upon this knowledge by finding an API that requires an authorization key. It is the logical next step on this journey. The world is full of APIs requiring keys and authentication – and thankfully so - so if you learn how to work with more involved APIs, your skill level will be solid…and marketable.
Have fun. Enough said.
Naturally, these are only meant to serve as guidance. Find what works for you and your needs.
/**/
References
Free Horoscope API from Astrology.com (ohmanda.com) | Amanda Y Huang
aztro API - The Astrology API. Get daily horoscope | Sameer Kumar
Share of people who believe in astrology in the United States as of April 2022 | Statista
How astrology paved the way for predictive analytics | The Guardian


